

Are you a MediaTek Smartphone user? It may be MTK 6572, MTK 6582, MTK 6589, MTK 6592 or whatever.You need to flash your phone when it has the Hard Brick position.So, how can you flash your phone easily by your own?
SP Flash Tool is the best tool to flash your phone easily without taking any kind of risk. in this guide I will describe SP Flash Tool, its features, how to flash any MTK phones using this tool and etc. So, let’s start.
What Is SP Flash Tool?
SP Flash Tool (Smartphone Flash tool) is a free application of MediaTek Corporation which allows you to install/flash Stock Firmware/Stock Rom, Stock and Custom Recovery, update Firmware, unbrick brick MTK Android phones etc. It is a cross-platform software. So, you can easily use it any Windows and Linux machine.
This tool doesn’t need any extra hardware to flash phones. You just need a USB cable to transfer files from PC to Phone.
Features of the SP Flash Tool
- Simple, Fast And Easy to Use
- Easily Flash Stock Firmware/Stock ROM
- Upgrade Stock Recovery To Custom Recovery Easily
- Don’t Need Any Extra Hardware
- Windows And Linux Supported
- Very Low Resource Uses
System Requirements
- A Pentium 4 Desktop Computer or Laptop
- A Fresh USB Data Cable (Original Preferred)
- MediaTek USB VCOM Driver (Download Link Will Be Given Below)
- MTK 65XX Scatter File. Can Be Found In Stock ROM
- At Least 50% Charge on Battery
Using SP Flash Tool On Windows
Now I am going to show you step by step guide how to use SP flash tool on windows. Then you will have no confusion about how to do it. Don’t worry, I will also discuss how to do it on Linux. So keep reading and be an expert.
But, Before using sp flash tool, you need to install USB VCOM Driver and install SP flash tool on your computer.
So, let’s do it.
Install Driver
First Extract Mediatek USB VCOM Driver and keep it where you can find it easily.
Then go to Windows Control Panel and open Device Manager.
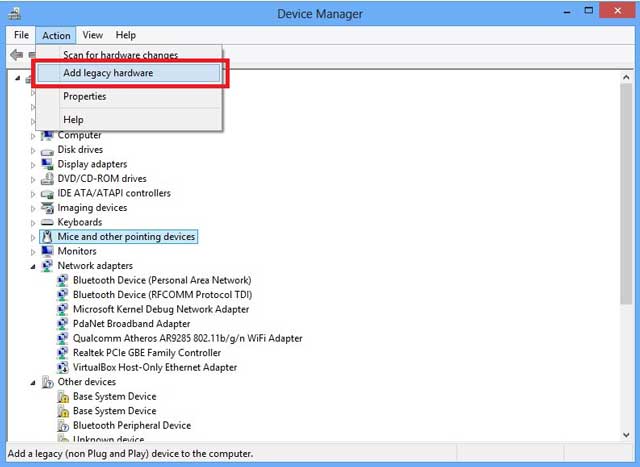
Click any of the device group of them that you see there, Now from Action menu at the top, select Add legacy hardware
 The Add hardware wizard will be launched, click Next
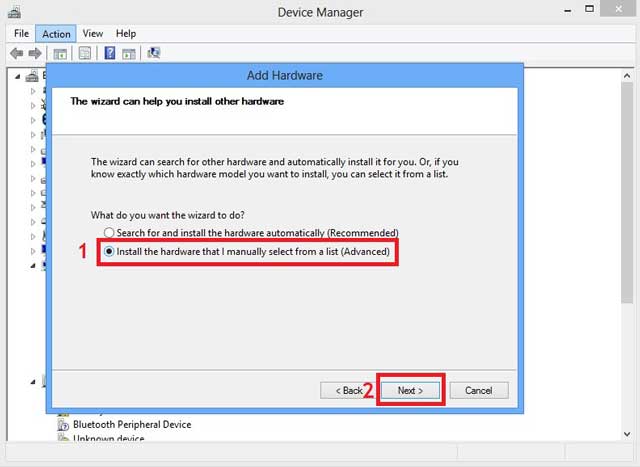 Now Select install the hardware that I manually select from a list (Advanced) and click next
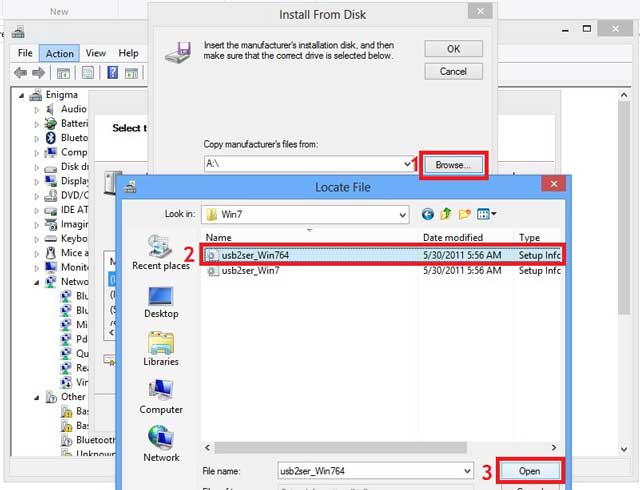 Now Click Have Disk… and Click Browse… then locate your driver’s .inf file and select it
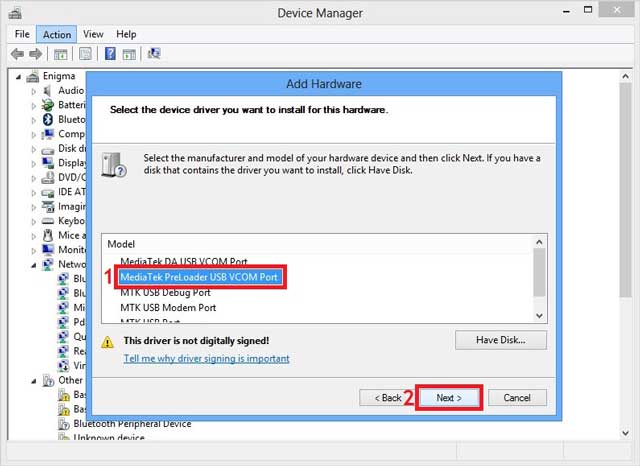 Click Open and You will see the drivers listed. From them Select your driver there (select MediaTek Preloader USB VCOM Port) and Click Next
 Click Finish. Ignore the Code 10 error. it’s nothing. You’re seeing it because you have installed an unsigned driver.
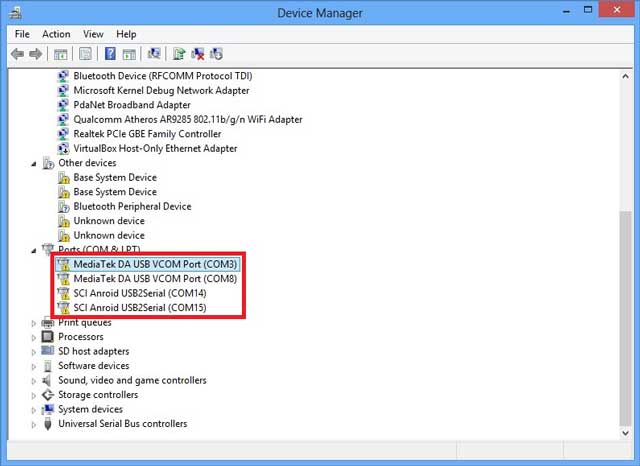 Now You can see drivers appear on the list. Ignore the yellow triangle warning. You’re getting it only because of you have installed an unsigned driver.
And done.
Note
- Ensure to select the 64 bit .inf if your PC is 64 bit
- If you’re using a Windows 8 PC or 32 bit PC then install the Windows 7 drivers
- If SP flash tool or other software still don’t detect your phone then install MediaTek DA VCOM Driver.
- You can install more drivers from the list one at a time if needed.
Install SP Flash Tool
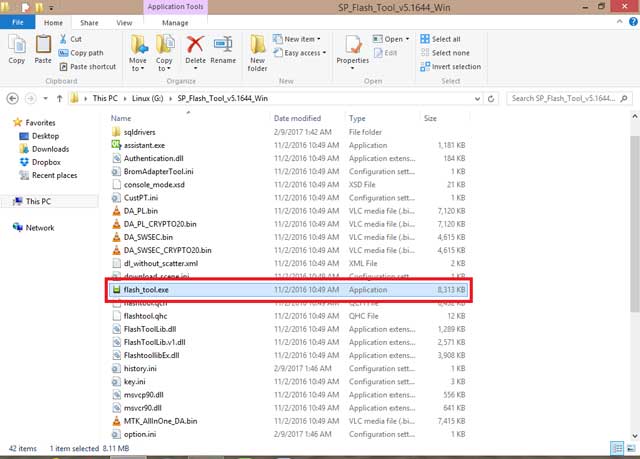
Installing SP Flash Tool on windows is just like other software. You need to download and extract SP Flash Tool on your computer. then find “Flash_Tool.exe” from extracted file. Now launch it by dabble click or Ran as Administor. After that, you will see sp flash tool is opened.Now you can install/flash Stock Firmware/Stock Rom, Stock, and Custom Recovery, update Firmware, unbrick brick MTK Android phones and so on.
Flash Phone Using SP Flash Tool
If you install USB VCOM Driver and install sp flash tool on your computer. Then Flashing Phone is not so hard for you. You can do it just follow the instruction given below.
Flash A Custom Recovery
So How To Install Custom Recovery Using Sp Flash tool. Frist, Now find recovery.img file and download it. I meant it could be TWRP/CWM you can place it on your Pc desktop or where you can find it easily.
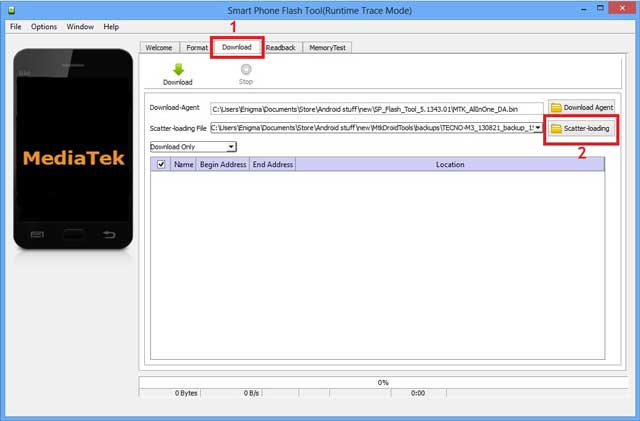 After launching SP Flash Tools fast click Download then click Scatter Loading.
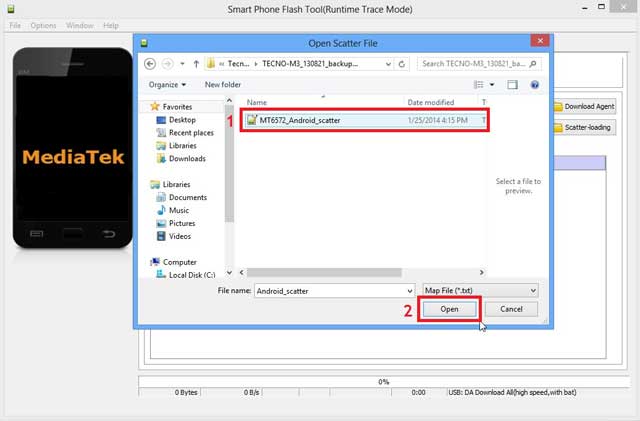 Now find and select the scatter file of your device it would look like this (MT6572_Android_Scatter.txt) just click on “Open”.
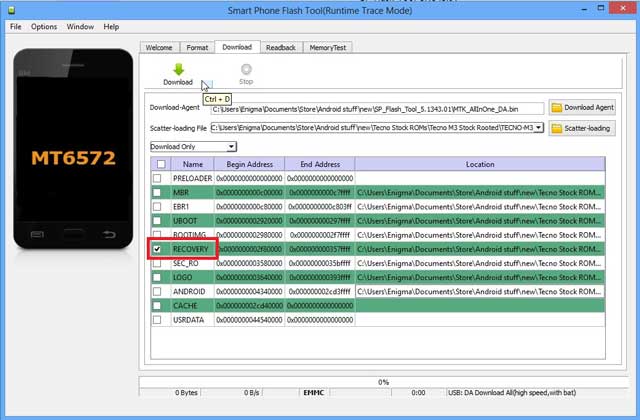 You should see below image from your Sp flash tools. Make sure all boxes are NOT checked, if there’s a check, remove it by clicking the check.And now, click “RECOVERY” from the list. in the mine time, a new window will pop up, locked the recovery image for your phone that you want to flash or install. Now click Open.
Now, SWITCH OFF your android phone. When it is off, click the “DOWNLOAD” button on the SP Flash Tool, then click Yes. After that, connect your Switched-OFF phone to your computer using USB Cable and allow the flashing procedure to do its thing.
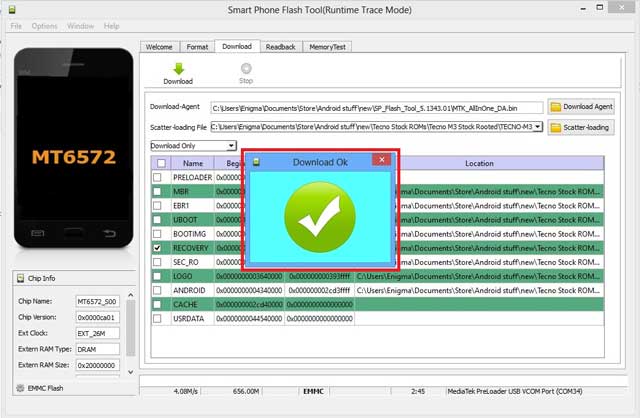 After successfully flashing your custom recovery img, you will see a green “OK”. That’s all, your phone is now running custom recovery img. Now unplug your device, press and hold Volume up + Power button to boot into recovery mode.
See it’s not too hard.
Using SP Flash Tool On Linux
It is too easy to install sp flash tool on windows. But how to install sp flash tool on Linux. Well, Some say it is too heard but I say it’s not. Just read the post and you will say just like me. Its seem too heard but it’s not.
Let’s see how to do it on Linux.
Install driver on Ubuntu
install the Linux generic USB-driver package
[alert-success]sudo apt-get install libusb-dev libmtp libmtp-runtime[/alert-success]Install SP Flash Tool on Ubuntu
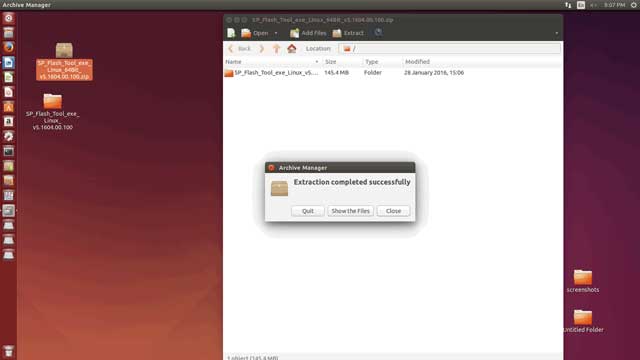 Fast of all you need to download sp flash tool and Extract it on Desktop.
Now open Terminal, For opening a Terminal, go to Dash and search for ‘Terminal’.Or, press ‘Ctrl+T’ from the keyboard to open Terminal.
Type the below commands on Terminal:
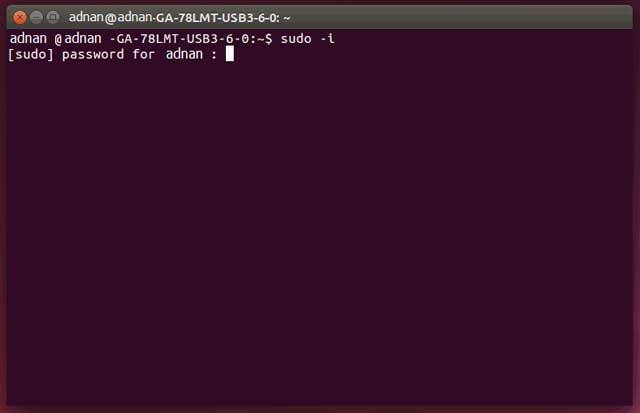
[alert-success]sudo apt-get install libusb-dev[/alert-success]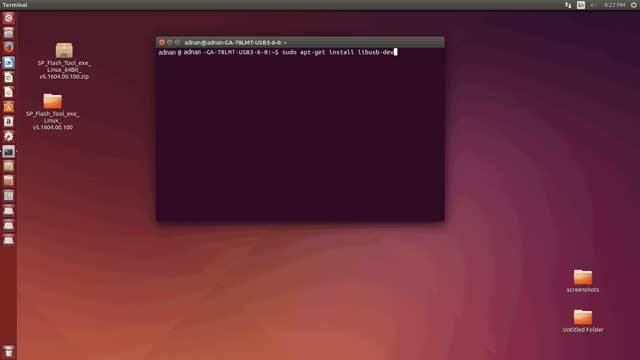 And give your password
 Now it’s going like this
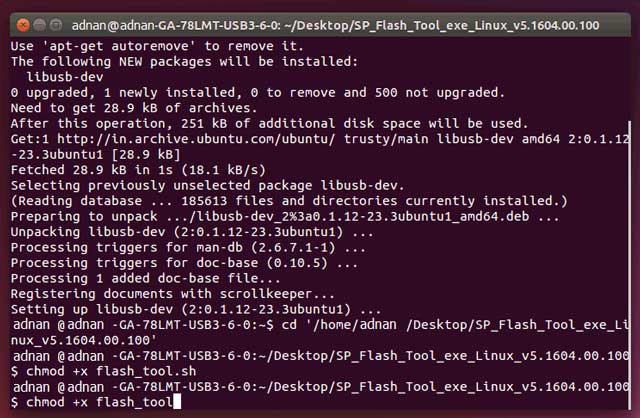
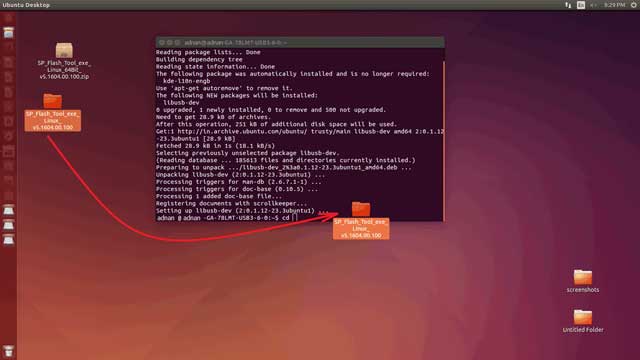 Then type “cd” on the terminal and give a space then drag and drop “SP_Flash_Tool” folder to the terminal, press enter.
Now run these commands like this
[alert-success]chmod +x flash_tool.shchmod +x flash_tool[/alert-success]
 And run these commands:
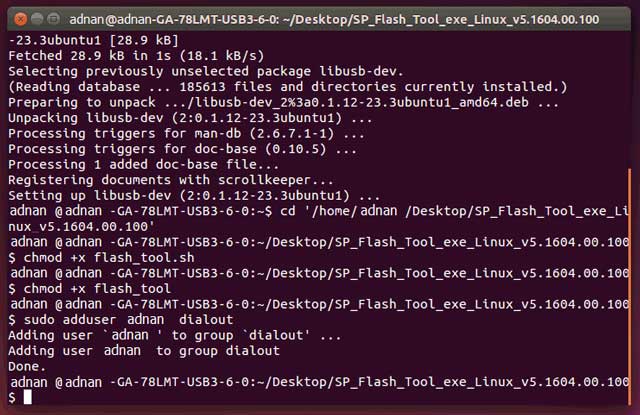 Then Type
 and give your password
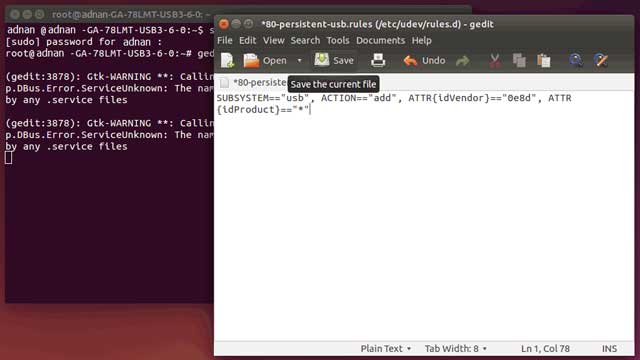
Then type below command:
gedit /etc/udev/rules.d/80-persistent-usb.rules
Copy the below string in the text file opened automatically by gedit ,Then save and close it:
 SUBSYSTEM==”usb”, ACTION==”add”, ATTR{idVendor}==”0e8d”, ATTR{idProduct}==”*”
And then this command:
gedit /etc/udev/rules.d/20-mm-blacklist-mtk.rules
Copy below 2 strings in the text file opened automatically by gedit, Then save and close it:
ATTRS{idVendor}==”0e8d”, ENV{ID_MM_DEVICE_IGNORE}=”1″
 ATTRS{idVendor}==”6000″, ENV{ID_MM_DEVICE_IGNORE}=”1″
Then run below commands:
[alert-success]sudo service udev restart[/alert-success]Now setup is completely done, next time you don’t have to follow these steps. Just go to terminal and follow below steps to open sp flash tool.
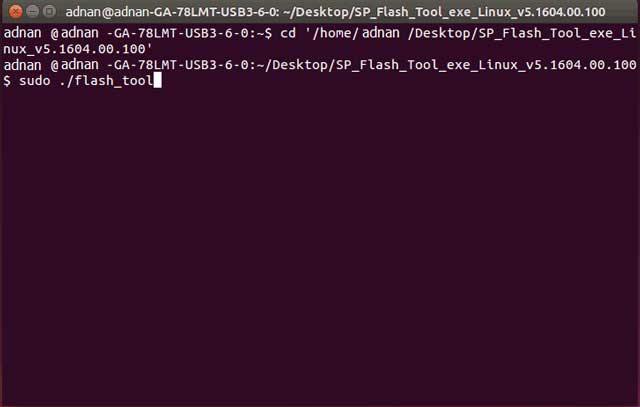 Open terminal and type “cd” then give space and drag and drop “SP_Flash_Tool” to the terminal.
And then type
[alert-success]sudo ./flash_tool[/alert-success]Give password
Now sp flash tool will open.
Fixing ROM ERROR On Ubuntu
Okay on windows I show you how to Flash A Custom Recovery
Now I going to show you how to fix room error using SP Flash Tool on Ubontu.
Open terminal and type “cd” then give space and drag and drop “SP_Flash_Tool” to the terminal
Then
[alert-success]sudo ./flash_tool[/alert-success]and Give password
Just said before
Now Copy ROM and extract it in a folder on Desktop.
Then
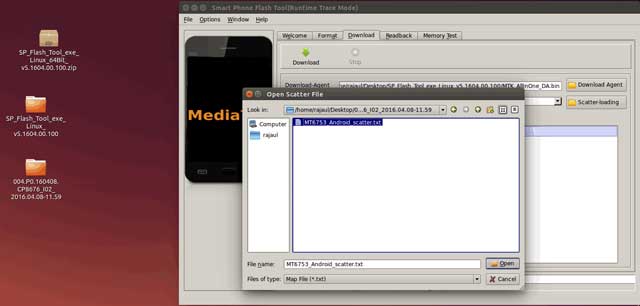 Click on the scatter-loading and also locate the scatter file from extracted ROM folder.
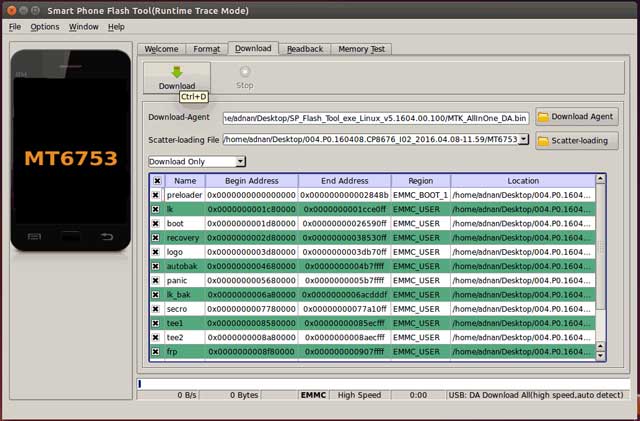 Now Click on the “Download” button .
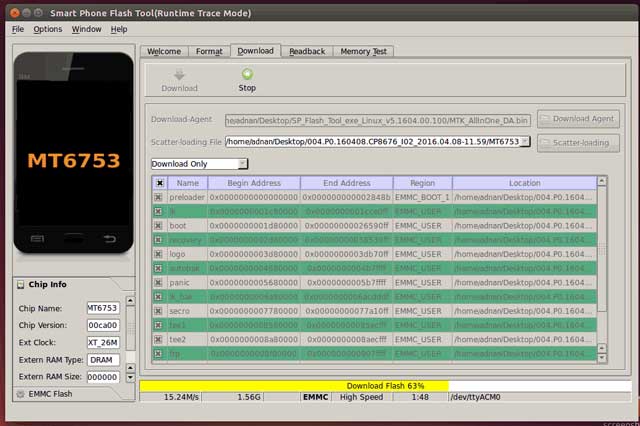 Switch off your device and connect to PC or Laptop through USB cable.
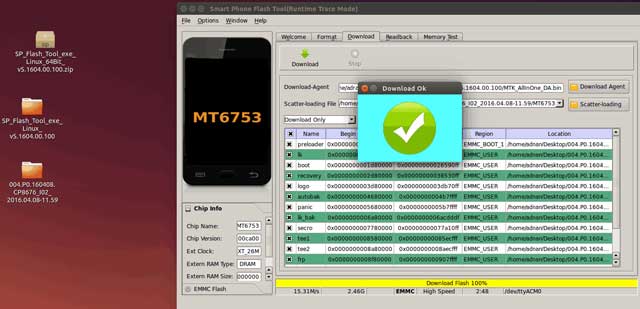 Wait untill a green pop-up appears and you will see a “Download Ok” message :
And now Disconnect phone and press power button to reboot.
Install driver on Debian distro
Install the Linux generic USB-Driver package
[alert-success]sudo apt-get install libusb-dev libmtp libmtp-runtime[/alert-success]Install driver on Arch Linux distro
[alert-success]sudo pacman -S gvfs-mtp libmtp[/alert-success]Install SP Flash Tool on Debian/Arch Linux
It is easy to install SP Flash tool on Debian/Arch linux. all you need to do run those coud on terminal.
Download SP Flashtools and locate to /opt
[alert-success]cd /opt wget http://spflashtool.com/download/SP_Flash_Tool_exe_Linux_64Bit_v5.1520.00.100.zip unzip SP_Flash_Tool_exe_Linux_64Bit_v5.1520.00.100.zip mv SP_Flash_Tool_exe_Linux_v5.1520.00.100 SPflashtools rm SP_Flash_Tool_exe_Linux_64Bit_v5.1520.00.100.zip[/alert-success]
Fixing ROM ERROR on Debian/Arch Linux
[alert-success]touch /etc/udev/rules.d/80-persistent-usb.rules echo “SUBSYSTEM==”usb”, ACTION==”add”, ATTR{idVendor}==”0e8d”, ATTR{idProduct}==”*”” > /etc/udev/rules.d/80-persistent-usb.rules touch /etc/udev/rules.d/20-mm-blacklist-mtk.rules echo “ATTRS{idVendor}==”0e8d”, ENV{ID_MM_DEVICE_IGNORE}=”1″” > /etc/udev/rules.d/20-mm-blacklist-mtk.rules echo “ATTRS{idVendor}==”6000″, ENV{ID_MM_DEVICE_IGNORE}=”1″” >> /etc/udev/rules.d/20-mm-blacklist-mtk.rules[/alert-success]
Consideration
- Take Backup – Before using sp flash tool take a backup of your personal data. Because it will remove when you flashing phone.
- Warranty – Your phone warranty may invalid if you flash any custom ROM or custom recovery.
- Confusion – Don’t confuse with custom ROM and stock rom they are not same. Though stock ROM never invalid Phone warranty.
- Remember – If you made any mistake during flash your phone we are not reasonable for this. Please read carefully then use sp flash tool. So we recommend that before using smart phone flash tool get complete knowledge about it. And try to use latest version.
Download SP Flash Tool
Latest Smart Phone Flash Tool
Download Version 5.1712 (Windows)
Download Version 5.1712 (Linux)
Older Smart Phone Flash Tool (Windows)
Download Version 5.1708 (Windows)
Download Version 5.1648 (Windows)
Older Smart Phone Flash Tool (Linux)
Download Version 5.1708 (Linux)
Download Version 5.1648 (Linux)
MediaTek USB VCOM Driver
Conclusion
In this post, I have described that, How to install, Configure and use SP Flash Tool. You can use both of them. But, I recommend that if you using this fast time then try to do this on Windows.
If you have and question or suggestion about this post, please fill free and let me know by leaving a comment. I will answer to your question soon.
Thanks for reading ‘SP Flash Tool – The Ultimate Guide + Download Link’


10 thoughts on “SP Flash Tool – The Ultimate Guide + Download Link”
This is a very big and effective post about “Sp flash tool”. And you guys are mention very important thing in post and this information very useful for me. Thanks for sharing this important and useful content .Now I can flash my android phone by using Sp flash tool on Linux and windows .
I am so happy to find a blog like this. Thanks for this post.
Well, I have a question – can I flash my phone Samsung J2 with Sp Flash Tool?
I am really happy to say it’s an interesting post to read . I learn new information from your article , you are doing a great job . Keep it up.
I have one question can I flash my Moto E 4 Plus ??
Yes,You Can flash my Moto E 4 Plus By Sp Flash Tool.
It is very nice find a good site that provides informative post.
And this post “Sp flash tool” is so helpful.
Will you tell me how to install sp flash tool on iMack.
Is there a 32-bit version of SP flash tool for linux?
Incredible! This blog looks exactly like my old one!
It’s on a completely different topic but it has pretty much the same layout and design. Superb choice
of colors!
Good interesting post for me.
I added your site into my favourites.
Keep up good work! Looking forward for future updates.
Regards,
David